Wednesday, April 27, 2011

Lost and Found

Over Christmas, some friends back in Maine told us about a "lost" trail that they used to hike when they lived here about ten years ago.  At that time, it had been closed by the rangers and was no longer on any of the current maps.  Their stories of a beautiful creek, deserted trail, and cool summer weather really drew us in.  But there was one problem, they couldn't remember exactly where it was; all they knew was the general area and the name of the creek. 

Earlier this year (first 3 pictures) we decided to go in search of it.  First, we did some research.  But other than one obscure picture with a GPS coordinate and a google earth map of the area, we didn't come up with much.  We decided to give it a shot anyway; the lure of a lost trail was just too much!  

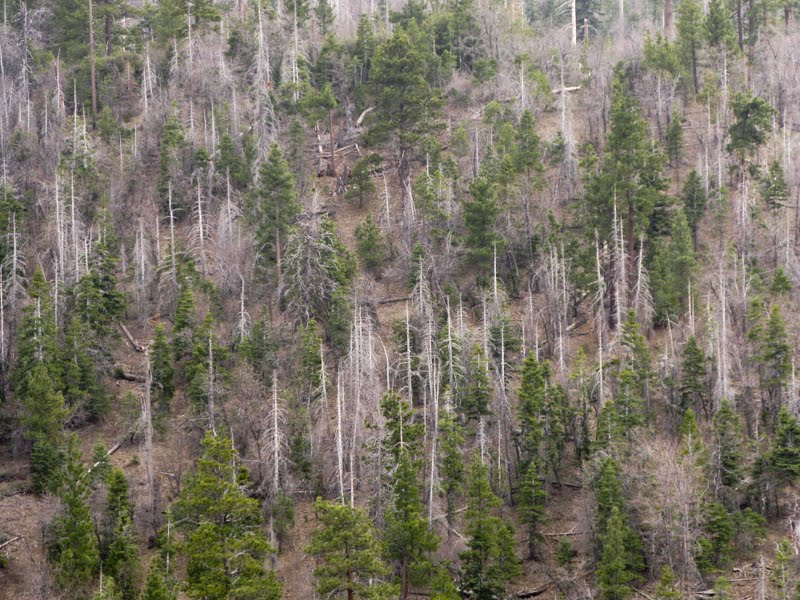
Once we were in the general area, we were discouraged to discover that there was much more snow than we had anticipated.  This would make lost trail hunting rather difficult!  We set off, wandering far beyond our actual destination and debating liberally about where this illusive trail might begin.  Eventually we heard a rushing creek and began to follow deer trails along the top edge of a very steep ravine.  We finally discovered an unmarked, well-traveled path that led down, down, down to the creek. It was a beautiful spot, and very chilly!  We followed a stomped down trail for a short ways, but then the tracks in the snow gave out.  We were at a loss to know where the trail continued.  After searching around for a while, we concluded that this was definitely a possibility, but we would need to return when there was less snow in order to make sure.  On the way back, we discovered a much more direct and obvious trail that led right back to the car.   We had ignored it on the way in because we thought it was to soon to be what we were looking for.

Last Sabbath we returned to follow the trail further.  And we can now say that we have "found" the "lost" trail!  No, I'm not going to say where it is.  But if you come visit, we'll give you a personal tour!  It's an incredible stream with lots of small waterfalls and beautiful scenery.  The trail was hard to pick out at times due to lack of upkeep and fallen trees but that made it all the more interesting.  We definitely plan to return in the summer when we can enjoy the water more.  Here is a few pictures from our hike.


Friday, April 22, 2011

Wholegrain Bagels


--

Step One - Dough!


Step Two - Form the Bagels


 Step Three - Rising Time

Step Four - Boil

Step Five - Toppings!

Step Six - Bake and Consume!

Notes: 

Wednesday, April 13, 2011

Neat finds

1. Wow...


2. Eagle Mom and Dad with their three eaglets!


3. This awesome wooden puzzle:


4. Beautiful wooden plates!

5. This Radiolab on the topic of music


6. An interesting blog about gardening and DIY.  Check out these two posts:


Oh!  And one more... You've got to check out this adorable, beautiful, priceless book.  Barry and I are going to be just like that when we are 90! :) :)


Enjoy!

Monday, April 11, 2011

No-bake Strawberry Tarts with Vanilla Cream Filling!


I had some leftover cream cheese from the Buckeyes, along with some fresh strawberries from the Redlands farmer's market that were getting a bit withered in the fridge.  I had planned to make these little tarts to use everything up but I haven't been feeling well and was pretty tired.  I don't usually make desserts when I'm sick (in fact, the last couple of posts about desserts are really an anomaly.  I don't actually make desserts all that often.) but I needed to use the cream cheese and strawberries up.  What's a girl to do? ;)

But then Becky Carlton showed up and provided more than enough energy to get the job done.  The  filling was so good that we were snacking on strawberries dipped in the extra cream sauce during the whole process!  Once prepared, these are best eaten the day of making them.  But the filling and topping hold well in the fridge if you want to prepare it ahead of time.


No-bake Strawberry Tarts with Vanilla Cream Filling
Makes 4-5 small tarts

Crust
9 graham crackers, crushed
4 Tbsp margarine, melted
(If you run out of graham crackers or don't have any, blend a mixture of nuts and skip the butter.  It works perfectly and tastes wonderful.  I happened to have some graham crackers this time so I used them instead.)

Creamy Filling
2 blocks tofu
4 oz Cream Cheese (that happened to be the amount I had left.  Use whatever you've got or not at all.)
Scant 1/4 cup sugar
Juice of 1/2 a meyer lemon
1/2 tsp vanilla flavoring (or the seeds from 1/2 a vanilla bean pod)

Strawberry Sauce
1 cup strawberries, washed and hulled
Sugar, to taste (We used only a tablespoon because our strawberries were so sweet.)
Juice from 1/2 a meyer lemon

Garnish
Sliced strawberries
Mint leaves

Directions:
  • Mix crushed graham crackers and butter in a bowl and press into small tart pans to create a firm crust. 
  • Blend tofu, cream cheese, sugar, lemon juice, and vanilla in blender until smooth.  Pour into prepared tart crusts.  Smooth with spatula or spoon.
  • Blend strawberries, sugar, and lemon juice in a blender until smooth.  Pour over top of the creamy filling in the tarts.
  • Garnish with sliced strawberries and mint leaves.
  • Chill & enjoy!


Come join the fun at the My Baking Addiction and GoodLife Eats Holiday Recipe Swap sponsored by Beanilla.

Monday, April 04, 2011

Our Wedding Book

Hi Friends!

I put together a wedding book for a christmas present for our families this year and I thought I'd post a full preview here so you guys could enjoy it too.  Click the little box with arrows in the lower right hand corner to view it fullscreen.

Friday, April 01, 2011

My Buckeye Mess!

I set out this afternoon to make Buckeyes for some friends.  It seemed simple enough: simple list of ingredients, simple instructions = simple yumminess.  Plus, I had gotten a large back of chocolate chips at Costco on sale for $2 off!  I told Barry that the bag would probably last us at least two years, seeing as how little we partake of chocolate.  He told me that he certainly hoped it didn't last that long and proceeded to request chocolate chip cookies within the next two weeks.  But I had my heart (or stomach) set on buckeyes so I proceeded with my plans.

I first started to question things when the instructions stated that the dough should be somewhat dry and easily shapable.  My dough was anything but dry - maybe that had something to do with my use of margarine instead of butter... ??  So I added some more graham crackers and flour but the wet dough just seemed to soak it up like a sponge!  I decided to proceed, since they were somewhat shapeable.

Next I melted my chocolate, happily anticipating what should have been the fun part - dipping my peanut butter balls into the chocolate.  The instructions said to use a skewer or a fork.  But when I proceeded to dip, my dough ball broke in half!  I tried every trick I knew to get those crazy buckeyes to dip properly but they just wouldn't have it.


Well, if I can't dip, I'll drizzle!  But my high hopes of delicate lines of chocolate crisscrossing each buckeye were not to be.  The chocolate wasn't the right thickness or temperature or something! for my drizzling needs.  Did I mention we don't use chocolate very much?

Next I attempted the frosting method.  I took a ziplock bag, cut a tiny hole in the corner, and tried to squeeze the chocolate out.  It worked for a few buckeyes, but then the hole started to jam and all that would come out was globs.  That wouldn't do...


Finally, after freezing the buckeyes in the freezer for a while, I was able to use my fingers to keep them together while dipping but it resulted in a rather sloppily covered buckeye.  I peevishly glared at my mess - I wanted pretty buckeyes, not these ugly things!

Then, I ran out of melted chocolate.  So I got out my huge bag of costco and started all over again - melting my chocolate in my makeshift double boiler.  But I unknowingly got about a tablespoon of water in the chocolate and my nicely melting chocolate started to act funny.  It got thick and sticky and wouldn't melt!  I tried everything - I put it in the oven and tried to melt it that way but to no avail.  I put it back on the stove and tried that again but that didn't work either.  Finally, I got smart and googled my problem.  Sure enough, I had made one of the cardinal mistakes with chocolate.


That was it, I wasn't going to try any more.  I left the remaining dough balls uncovered and stuck the whole lot in the fridge where I didn't have to look at them any more.


I then went and attempted to take a nap to forget my woes*.  To top it all off, I had been snacking on my mistakes and I could feel the threat of a sore throat coming on.

After getting up from my short and rather unsuccessful nap, I decided that life wasn't so bad after all.  A few of my buckeyes were somewhat decent and besides, there's a lot worse things than a pile of chocolate to use up!  If you give the recipe a try, be forewarned - make sure the dough is dry enough and DON'T LET ANY WATER GET IN YOUR CHOCOLATE!

The End


*I was planning to take a nap anyway since I have to work NOC shift tonight.

PS.  There were a few that turned out nice :)  Including this ONE pretty drizzled buckeye: